what chisel is used to cut wood bow ties
Wood Inlay for Beginners--Bow Tie Articulation
Tools/Materials Needed
-
Router
-
1/4" straight bit
-
(Sharp) Chisels
-
Double side tape
-
Mark pocketknife
-
Forest Mucilage
-
Mallet or Hammer
If you are coming from my previous commodity yous have one, or perchance a stack of bow ties to inlay. This can exist a fun and super satisfying process. Only you will need a couple things to go started. First, and non negotiable. Are abrupt chisels. They don't have to be super expensive ones. I actually really like my Narex chisels. And they are quite affordable. I do take a lot of other chisels ranging from $v each to $100 each, and I can tell yous sharp should be your first, 2d, and tertiary consideration. Afterwards that y'all tin start looking at the advantages of other chisels. Whetstones are a great manner to get a razors border, but take a lot of practice. If you want a dummy-proof sharpener, I love my Worksharp.
Other tools you will demand are a plunge router. In this instance, I reach for my cheaper bosch router. My expensive festool router doesn't clear the forest shavings too as the bosch. In the router you'll demand a i/4" directly bit. A spiral bit will last much longer and double the ability of your router. So use a spiral straight bit if y'all can. Y'all will too need a mark knife. I've seen people use box knives, simply exercise yourself a favor and drop $twenty on a prissy Japanese marking knife. It'll concluding y'all forever, and work infinitely ameliorate than a box pocketknife or xacto pocketknife. The last thing you volition need is sparse double side tape. More on that in a second.
Inlay Process
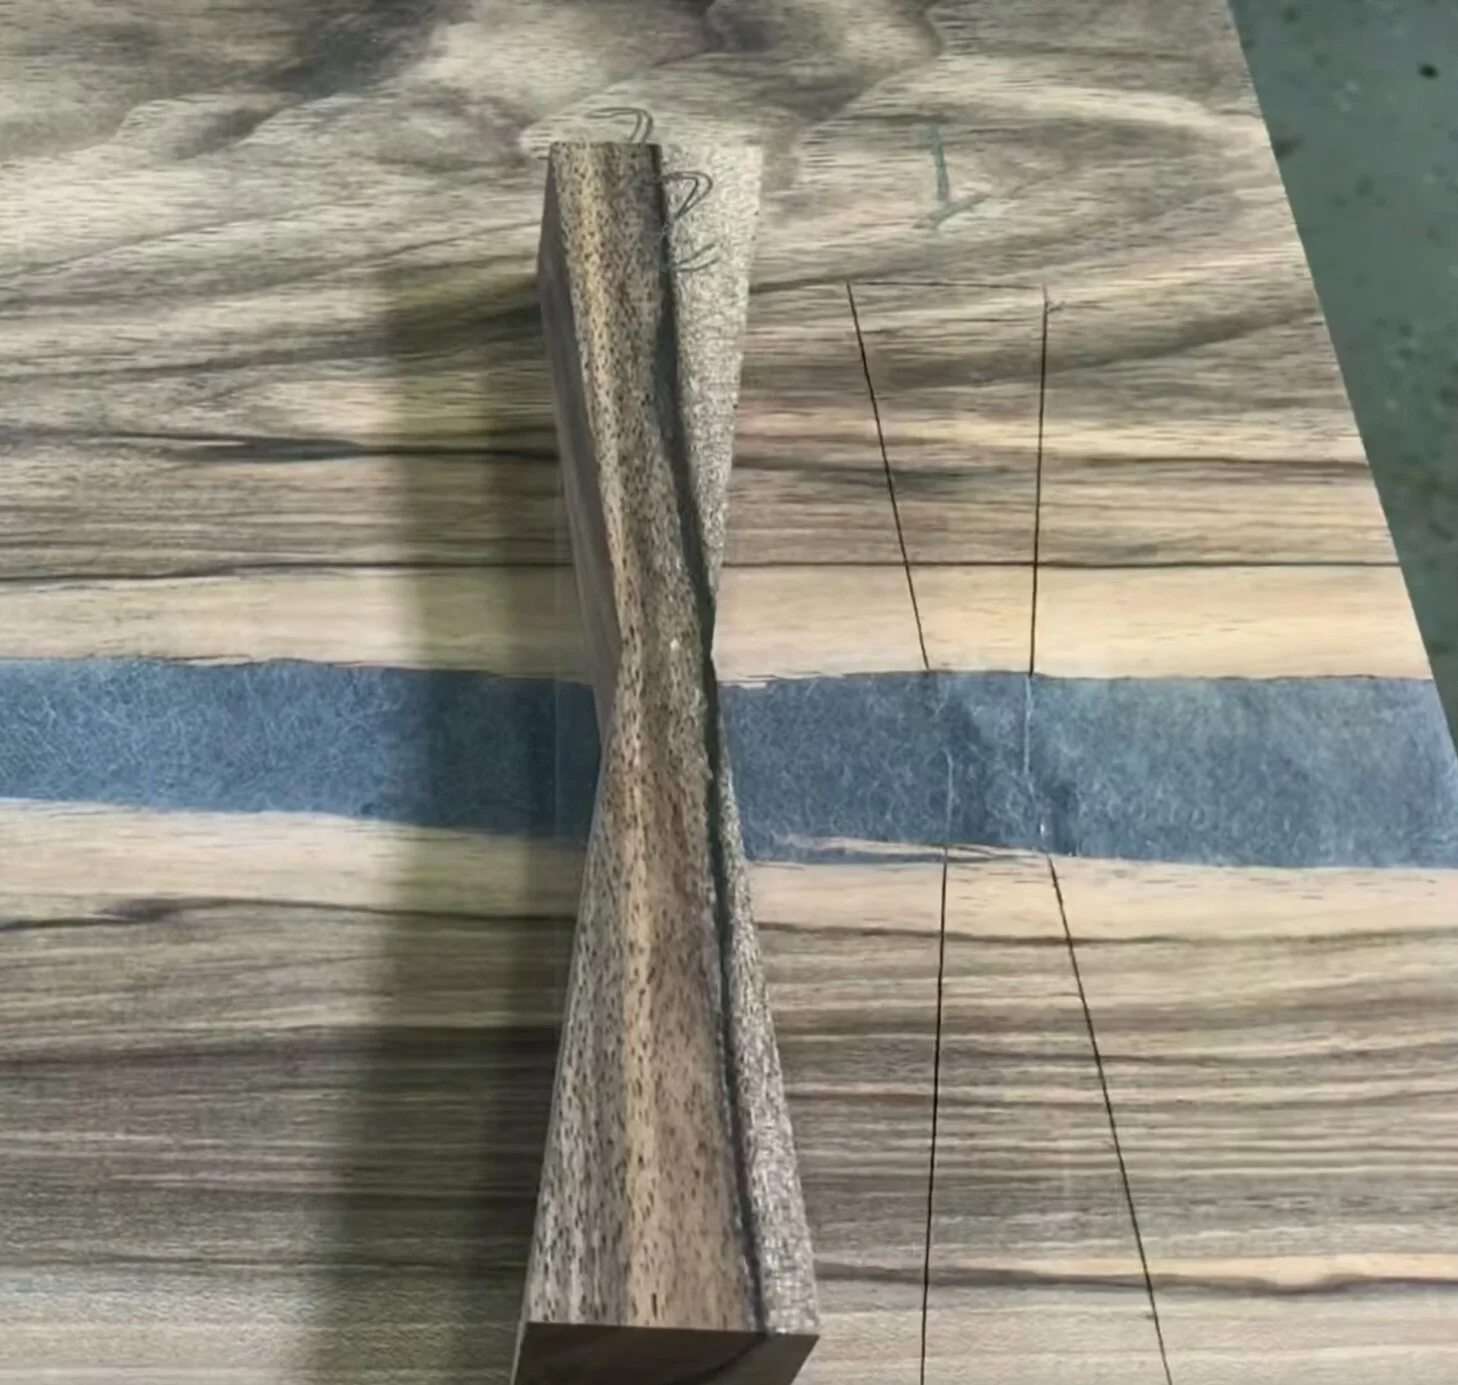
Nice solid line marked
If you are inlaying multiple bow ties, you are going to want to number them. Even though they are all supposed to be exactly the same, in that location will be minor differences that could ruin a project if you attempt and get the wrong 1 in the wrong hole. So marking a number on each 1, and the corresponding number on the slab where it is going.
Now take your double side tape, and stick information technology to the bottom of a bow tie. And so firmly press it where you would similar to inlay information technology. Information technology should stay pretty firmly in place. Making calorie-free passes, trace the shape with your mark knife. Don't push too hard. Just brand several light and fifty-fifty passes around the entire bow tie. You want a pretty good outline scratched into the wood when y'all're done.
Router Work
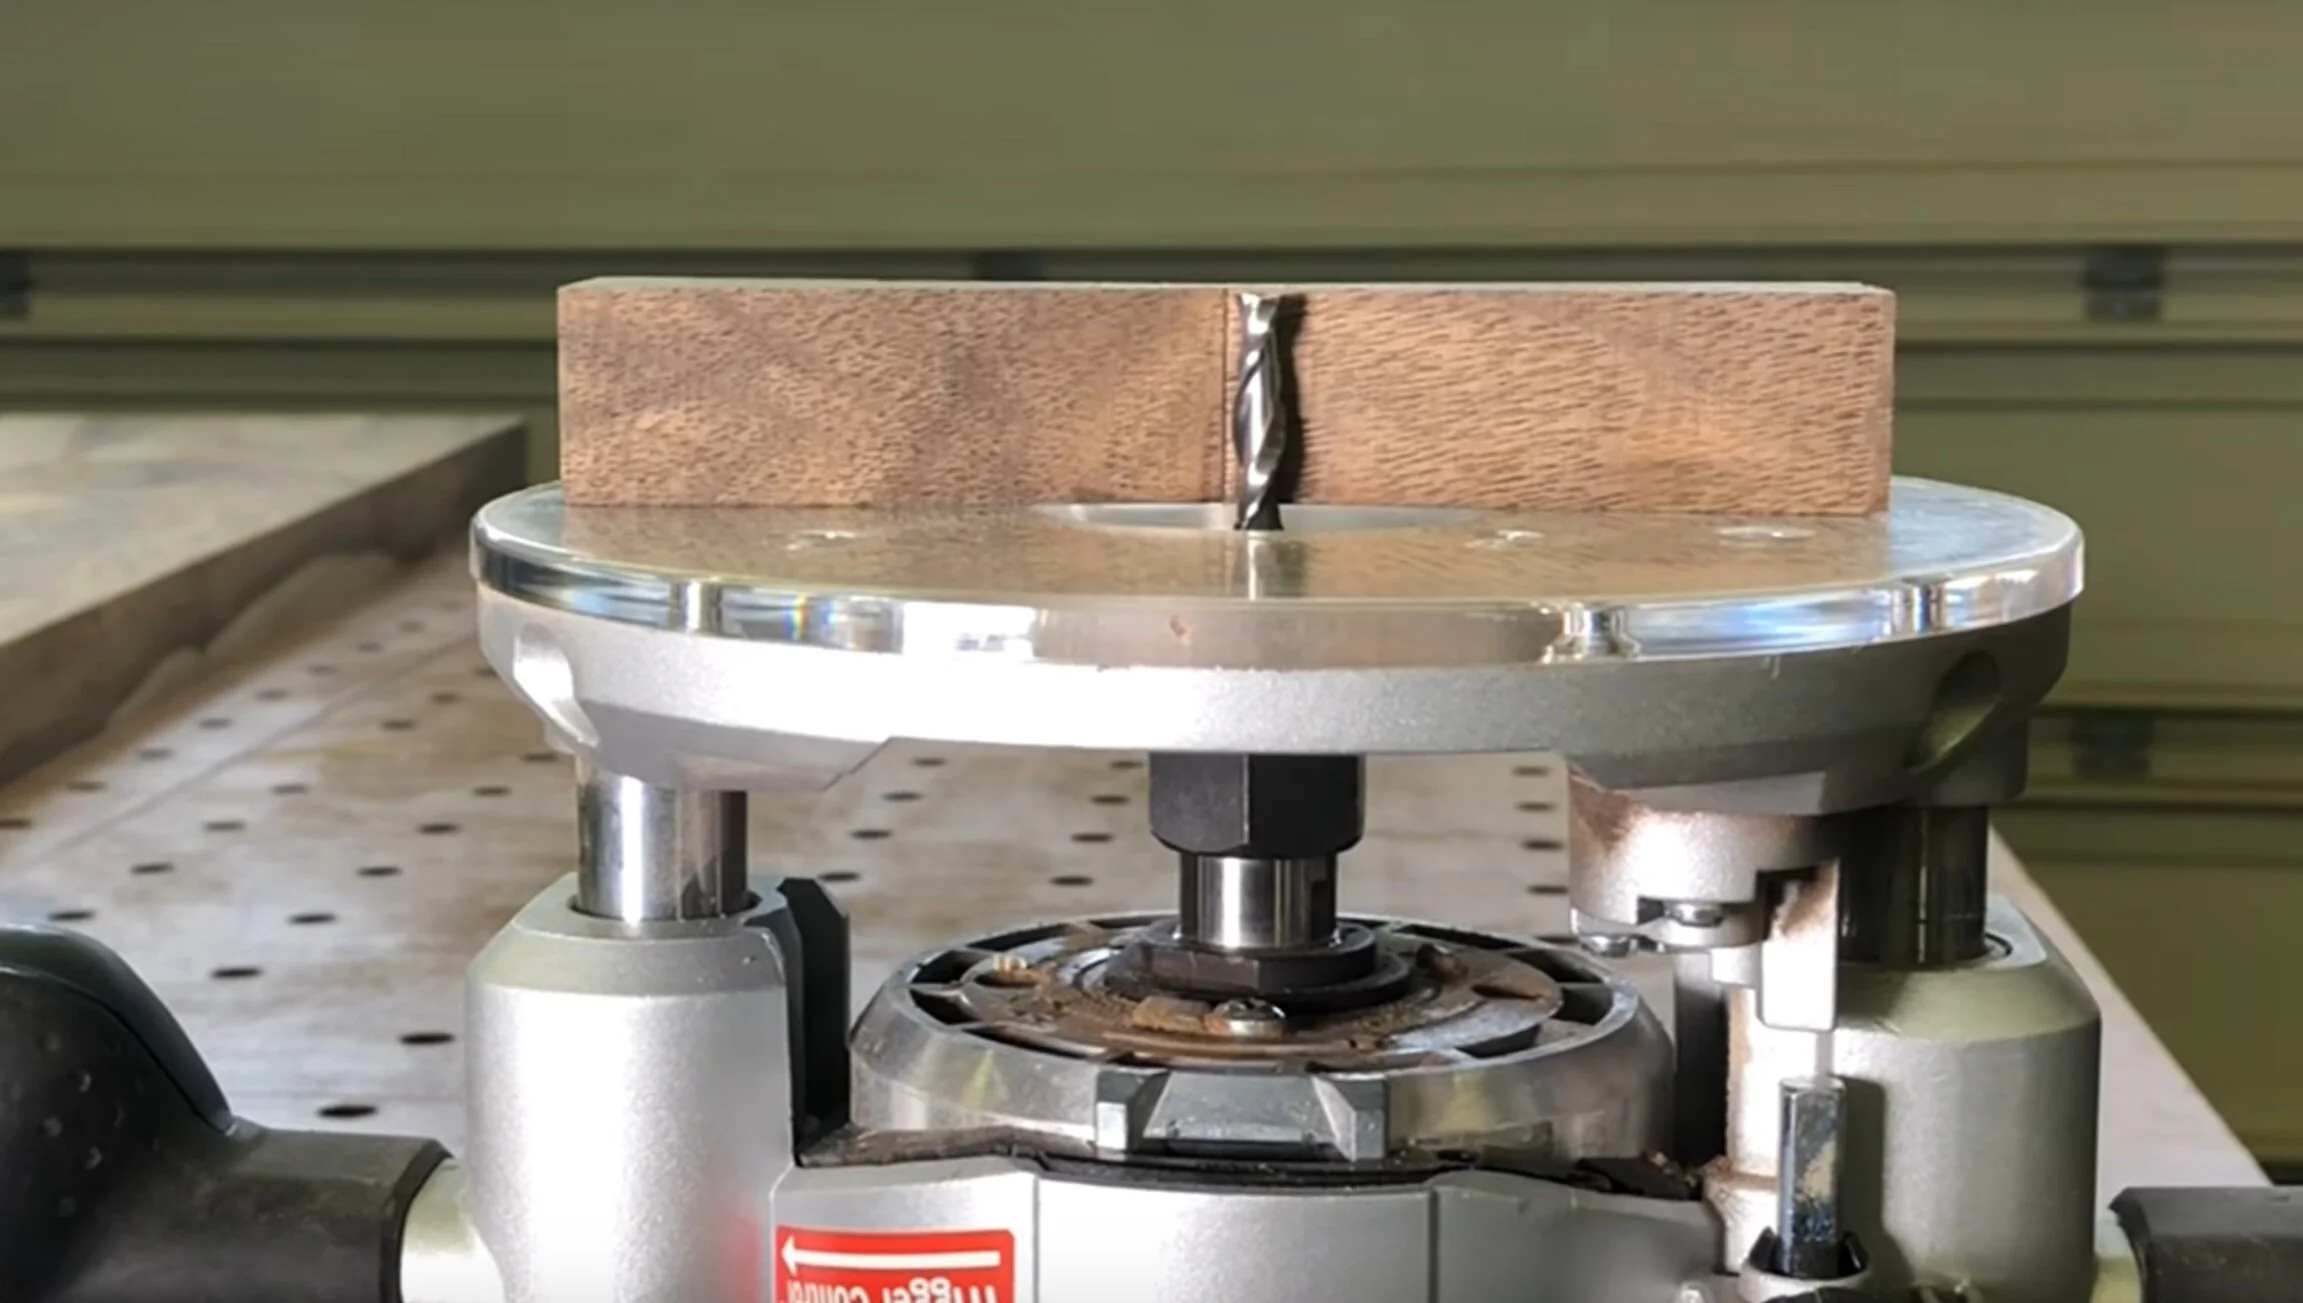
1/4" spiral bit, fix merely below the depth of the bow tie
Go ahead and get that plunge router out, install your straight bit, and gear up the depth stop to just curt of the depth of your bow tie. Y'all want the bow tie to sit down just proud when fully inserted. The reason you lot don't want it flush with the bow tie, is that if you are a half a millimeter too deep, you will accept a sunken inlay that wont expect or feel right.
After you have your depth stop gear up, flip the router over and get ready to split your table. Make sure you lot have expert rubber spectacles for this part. I'm not the best about PPE, but I never take any chances when middle level with 20,000 rpms of carbide on wood. Start your router and smoothly plunge about 1/iv" at a time. Work up to nearly 1/16" from your marking knife line. Information technology can actually hurt to be too shut, so stay at least 1/32" from your line at the closest. Keep plunging 1/iv" at a fourth dimension, removing all the material you can without going too close to your line, until you have reached your depth cease.
This is a good altitude from your line
Thats a pretty flat chisel back. Got it with the Worksharp and strop attachment
Chisel Work
Now is the fun function. At least for me. I'll reiterate how much you want Precipitous chisels here. Unfortunately, this usually doesn't mean a factory border. So you will need to get proficient sharpening your chisels. A couple options are to use a good set of stones, like the ones from Nanohone. If yous aren't ready to get a samurai woodworker, bank check out the Worksharp organization. It will become a razor edge, fifty-fifty for dummies. The strop attachment is also definitely worth it.
Ok, ok, you want to know what to actually do with the chisels now? Lets finally get to that. You are going to take your woodworking mallet, hammer, or whatever you lot prefer to tap on your chisels with and start removing half of the remaining cloth between your router cavity and your marking knife line. Once you lot remove half, yous are going to keep removing information technology in halves until y'all accept no selection only to set your chisil right in your line. Don't go too aggressive here! If you try and take too much, yous will shrink the fibers and leave a minor just noticeable gap. You want a really abrupt, clean lines when you're done.
Once yous have your negative all carved out in your piece, you tin can plough your attention dorsum to your bow tie (or whatsoever you lot are inlaying). Now you are going to add a slight chamfer on the underside. This volition help information technology go in straight, as well equally give the glue somewhere to go.
Not perfect, only pretty sharp lines
Slide it in
Inserting is fairly straight forward, simply you want to be a lilliputian conscientious even so. Add wood gum with a modest brush to the edges and a tiny bit on the bottom (tip: do not use epoxy for this. Resin volition leave a dark line around the bow necktie). Line information technology upwardly in the pigsty and tap with a woods mallet lightly until it begins to go in direct. If it looks crooked at all, remove information technology and start over. Once information technology gets going, at that place is no coming dorsum out. And so ensure its straight. When you know it is going in properly, use a scrap slice of wood to spread the load out evenly and continue to pound information technology in. if information technology goes nearly of the way in, merely won't get any further, don't force it. Half a bow necktie is better than a cleaved bow necktie. Ideally it will lesser out and you'll observe a tone difference with your mallet and block..
Mix of walnut and maple dust from my sander
Now, no matter how expert you are, at that place is a strong run a risk your negative doesn't perfectly lucifer your bow tie. That is ok though, I'll show you lot a play a trick on most woodworkers don't talk about, merely most everyone uses. You lot are going to take a fleck of matching forest grit to your projection and mash information technology into the seam around your bow necktie. A good tip is to actually mix in a contrasting woods dust. I will mix maple dust with walnut, to give a picayune variation. Just like the natural variation in your woods.
Sanding Affluent
Requite your ugly dusty bow ties 24 hours to fully cure. Later on that, you tin can flush them up a couple ways. One of the more fun and satisfying methods is to use a hand plane or a lilliputian block aeroplane. As mush as I want this to be the all-time way, it isn't. A belt sander will practise a faster and oft a cleaner job than your manus plane. Just be careful not to dig into your tabular array with the corner of the chugalug. After you become information technology more or less affluent with the belt sander (or plane) you can hit information technology with an orbital sander with 100 grit. Past at present, if everything went equally planned, you lot'll have a perfect bow tie inlay!
CA glue and grit touch up
If everything didn't become equally planned…
In that location is a decent run a risk you will still have some mirco gaps left after sanding flush. That's fine likewise, I got some other fox for that. Take the same wood dust yous used before, mix in a piddling CA gum and fill your micro gap with that. Hit it with a spray of CA glue activator and it will be ready to sand in about thirty seconds.
And that's it!
This type of projection may seem intimidating at get-go, but if you take your time you really can become slap-up results after just a few attempts at this. Good luck, and check back in here for more tips and tricks!

Finished inlay
A silent picture show I did on the topic:
roywitheyesse1999.blogspot.com
Source: https://www.blacktailstudio.com/blog/wood-inlay-for-beginners-bow-tie-joint
0 Response to "what chisel is used to cut wood bow ties"
Post a Comment